Color Splash Effect in Adobe Photoshop
Use the Color Splash Effect! Recognize it from photos where everything is black and white, except for one item in the photo. It seems like something too difficult to ever recreate yourself. Let me break it down for you into steps that anyone with minimal Photoshop experience can do.
Step 1 Color Splash Effect – Layers
Duplicate the layer. This allows you to have a top and bottom layer of the same image. Think of it as a two slices of bread on top of each other. Cut a hole through the top slice, and you see the bottom slice of bread through that hole.


Step 2
Look at the layers panel to make sure you are working on the duplicate layer you have just created. It is highlighted in blue and the layer that does not have the padlock (locked layer).
Now adjust the image to a Black and White mode. Go to “Image” at the top. Then click on “Adjustments” and finally “Black & White”.

Confirm your selection.

Step 3
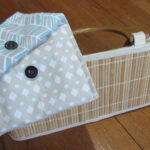
Use the selection tool of your choice. This time, I used the “Magic Lasso” tool to make my selection. Select the item you’d like to be shown in color.

If you look closely I am drawing a line with the tool around the object. Everything that is selected is outlined with what look like “marching ants” (below).

Step 4
Delete the area inside the selection. However you’ve only deleted the selection from the top layer. The layer below shows through and a colored version of the item you’ve selected appears. It’s just like magic!

Step 5
Flatten the image to merge the layers.

Show off your new Color Splash Effect image!
More Adobe posts:
Transparent Background in Adobe Illustrator