
Fill a Shape with a Photo in Adobe Photoshop
Fill a shape with a photo in Adobe Photoshop. Maybe you’ll choose a dreamy sunset or beautiful ocean waters. It’s all up to you. There are a few ways to achieve this. Keep reading for one I like to use.
Step 1: Choose Your Shape and Fill Images
Start with two Images. One will become the shape and the second will be the image within the shape.

First select the image that will be inside the shape. Start with that image. I’ve chosen a beautiful ocean view. Add a “New Layer” to this image. I left it as “Layer 1.” You can label it “shape” or anything you like.


Step 2: Move the “Shape Image” onto the “Fill Image”
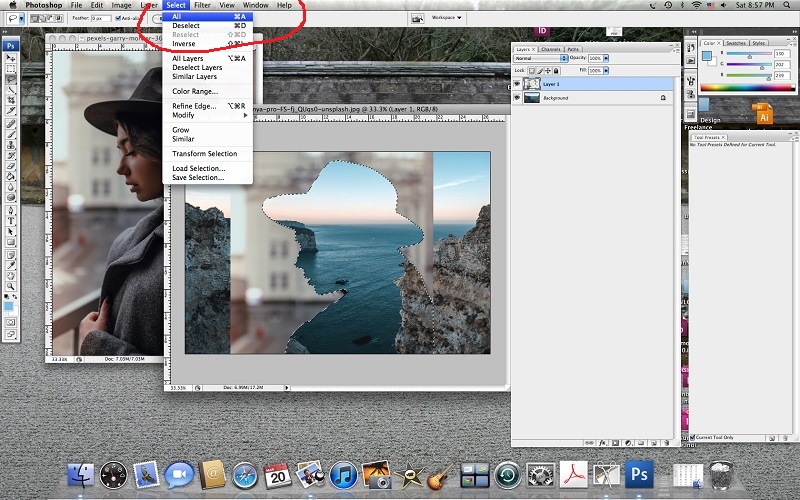
Go back to the image that will become the shape and Select All.

Use the “Move Tool” to drag that image onto the other one. I hit option (alt) key to do this.

Now the image that will become the shape is over the image that will go inside it. The “shape” image is located on “Layer 1”. The “fill” image is located on the “Background” layer.

Step 3: Create the shape
Use selection tools to select the shape you will use. I started off with the Magnetic Lasso and then the regular Lasso tool. (Make sure you are doing this while on “Layer 1.”)

I’ve selected the girl’s profile as my shape.

Then I hit delete.

Now you want to edit the shape that is left behind. Select All.
Use Command (alt) “L” to use the Levels. Change the Output Level to 17. This will turn the shape black. Now you are almost ready to Fill a Shape with a Photo!

Slide the shape over to a position that you like. (Make sure you are doing this while on “Layer 1”)

Step 4: Work with the Background Image
Hop over to the “Background” layer and Duplicate Layer. (You won’t be able to edit it because it’s permanently locked.)

Delete the original “Background” layer. You’re now left with “Layer 1” and the “Background copy” layer.

Select the part of the shape you want. Then inverse that selection to select all of the parts of the image don’t want. Next hit delete. (Make sure you’re on the “Background copy” layer.)

Step 5: Finishing Touches
Select the image and crop out the rest of the canvas.

Flatten Image to compress the layers.

You’re all done!
More Adobe posts:
The Pen Tool: Adobe Illustrator
Customized Color Presets (Filters) in Adobe Photoshop
Transparent Background in Adobe Illustrator

Image Credit: Shape / Main Image


I love the concept. Thank you for the idea.
I’m so glad you liked it Rose!
That is such a great concept! Thanks for sharing
Layla, Glad you liked it!