
DIY: Reusable Makeup Remover Facial Pads
I’ve been sewing a lot more and doing other crafts. So that means I’m going to have a lot of great new posts coming your way. Today we’re going to sew reusable makeup remover pads. I got the idea to get away from disposable cotton rounds from different articles I saw on the internet and figured I’d give making my own a try.

- fabric
- washcloth/towel material
- sewing machine
- sewing pins
- scissors
- round object to trace circle
- pen
Sewing Machine Used
Step 1: Cut out your makeup remover pads
Start by cutting the edge off of the washcloth. You won’t be able to sew over it (I tried). Remove the label/tag as well.


First, I used a round shape to decide what size remover pad I wanted. Then I used a pen to mark the shape onto the washcloth as well as onto the fabric. I tripled it so that I would have three round pads in each layer.


If you have sharp scissors you can cut through that many layers. If you have less than sharp scissors, then don’t double or triple cut the fabric. (Keep specific scissors for sewing. Cutting paper with scissors makes them dull. The scissors that I’m using have a tape on them marked “sewing” so that no one uses them for paper.)


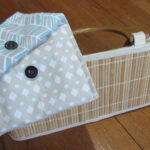
Step 2: Assemble your makeup remover pads
Assemble the circles that you have cut. Place a fabric circle onto each towel circle. The more vibrant side of the fabric should be facing up. This is the opposite of what you normally do when you’re going to flip your project inside out after. That doesn’t apply for this project.


If your circle pieces have more towel sticking out and less fabric, then the fabric will not get attached to the towel when you sew it. Your fabric can hang slightly over the towel. That’s okay. Use a sewing pin to hold the fabric together while you sew.
Step 3: All about serger stitches
You’ll be using a serger stitch to sew around the circles. That will keep the towel from unraveling. Look at the different stitches from my sewing machine manual. (I have the model Singer Heavy Duty number 4423.) Letter D of the S-1 stitches, worked best for me. I also changed the length of the stitches to about 1 on the length dial. You will need to find a comparable serger stitch on your machine.


SewGenius on YouTube gave me some great information about sewing with serger stitches. Serger stitches usually require a special serger machine. These special stitches are the creative way to finish your work and give it a more professional edge, without an additional machine.
Step 4: Setting up and sewing
When you’re sewing, you generally keep the fabric on the left side of the foot. (The foot is the part that holds the fabric or whatever you’re sewing down.) With this project, you’re going to put the fabric on the right side of the foot. You want to keep the fabric 3/4 of the way under the foot so the machine can grab both the fabric and towel material to sew them together.


Also make sure to use the reverse button at the beginning and end to lock your stitches.

Keep rotating the fabric so that there’s always 3/4 inch of fabric and towel underneath the foot. Make sure you rotate the fabric while the needle is down into the fabric so that you don’t lose your place.


This project was a little tricky for me. The pieces of the towel material got everywhere. And I don’t have much experience using a serger stitch. My advice is to keep trying, even if the stitches don’t come out perfectly. Even if the two pieces don’t attach correctly (above), you can always sew right over your mistakes. It won’t even be noticeable once you’re done. Your goal is to make sure that the edge of the towel does not unravel once you start using the makeup remover pad. It doesn’t matter how many times you need to re-do the stitch. Just keep at it and have fun!


super easy tutorial
so cool!
Thanks Tammy!
Excellent sewing instructions.
Thanks so much!