How to Stretch a Canvas
There was nothing else to do except bring home some of the art from Haiti. I purchased this beautiful landscape painting from a street vendor. He removed the frame and rolled it so that I could travel with it on the plane. I called a few local framing shops as well as visited Michael’s once I got back home. Many didn’t offer what I was looking for or were extremely expensive. Artist & Craftsman Supply assured me I could stretch the canvas myself. I continued to look for more shops that could just do it for me since I was hesitant about doing it myself.
A few YouTube browses later, I found the perfect video to help me stretch the canvas. In the end I went back to Artist & Craftsman Supply and purchased four wooden stretcher bars. This post would not be possible without the helpful tips from Vidya of What’s ur Home Story. It was her YouTube video that inspired me to make this most.

Tools
- clean working surface
- wooden stretcher bars (measure the painted part of canvas to determine the size and buy 2 each for length and width)
- measuring tape
- rubber mallet
- pencil
- nail gun (electric or manual)
- One handed trigger clamp or an assistant
Step 1
Connect the stretcher bars to form a rectangle. They have notches on each end that help you connect them. You can use a rubber mallet if it’s difficult to put them together.


Step 2
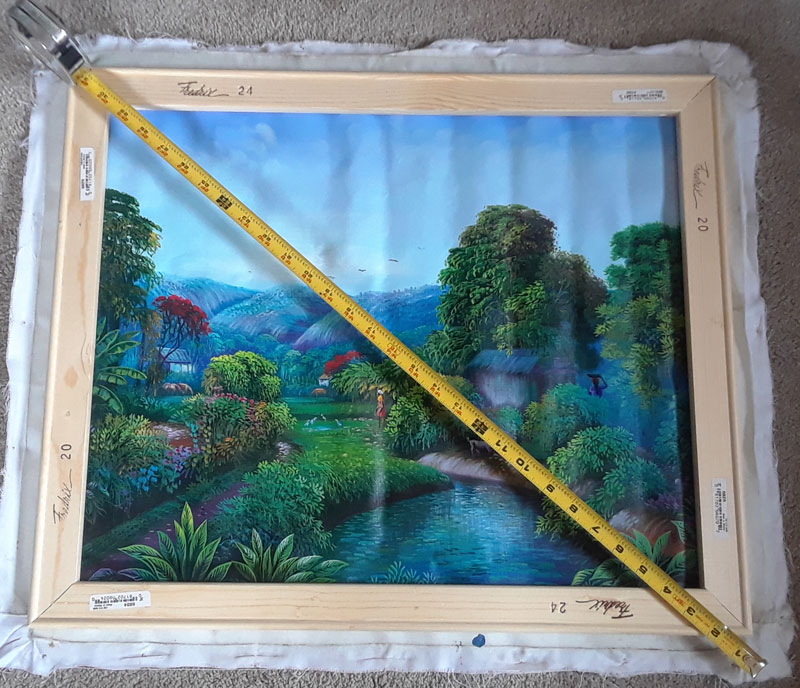
Place the rectangle over the canvas (painting side up) and use your tape measure to measure the diagonals. Then you will know if the rectangle is straight.
Step 3
Once you’ve done that, flip up the edges of the canvas at each corner while the canvas is still facing painting up with the frame over it. Then use a pencil to mark an X at each corner on the underside of the canvas so you will know where to position the frame.

Step 4
The canvas should be facing painting side down. Line up the frame where you drew the little X’s. Next use the one handed trigger clamp to hold one of the long sides of the canvas to the frame. Now you will want to stretch the opposite side over the frame. Then add a staple to the center top of frame, not the side rim of the frame. Now add a staple to the center top of the other side. Next do the shorter sides, only adding one staple each.


Step 5
Now turn the canvas around and make sure everything is straight.

Step 6
After you’ve checked it, add more staples to secure it, using the clamp and stretching the canvas so it is tight across the frame. Do the sides first, leaving the corners for last. Using too many staples will make it hard to remove them if you ever decide to take it off the frame.

Step 7
Then fold the corners as seen in the image. It almost looks as if you’re folding a napkin. Now fold down the edge and staple as shown.
You’ve done it! If it doesn’t come out perfect the first time it’s okay. I wish i hadn’t kept my painting rolled for so long, since it has ridges where it was folded. Practice makes perfect.